How to Build Your Own Badge Store Website: The Complete Guide
Every My Badge Studio seller account includes a real online store: your own storefront at mybadgestudio.com/store/your-name (or your own domain), with product pages, a cart, checkout, customer accounts and order emails — and every product wired to the badge designer, so customers create their own artwork and you receive print-ready files. This guide walks the whole road: setting up, designing, publishing, and what happens when the first order arrives.
The workflow at a glance
- Claim your store URL — the address everything hangs off.
- Add products — what you sell, at what price, with what photos.
- Set shipping — courier rates, pickup, free-shipping threshold.
- Choose payment methods — from invoice to card payments.
- Design the website — sections, colours, fonts, pages, in the visual editor.
- Preview, then publish.
- Run it — orders arrive in your dashboard, emails go out automatically, you update statuses and get paid.
Steps 1–5 are free to set up and preview. Publishing the site to the world is part of the Business Pro plan — so you can build the whole store, see exactly what customers would see, and pay only when you're ready to open.
Step 1 — Claim your store URL
In the seller dashboard, open Event/Client Access and claim your name. That single slug becomes your storefront address (mybadgestudio.com/store/your-name) and your client-portal address. Pick something short and brandable — it appears on every link you share. If you own a domain, you can connect it later in the website editor's Settings tab; the store answers on both.
Step 2 — Products
Products live in the dashboard under Website Developer. For each product you sell — 58mm badges, fridge magnets, keychains, whatever your press makes — you set:
- Name and price. The price shows on the product card and page, in your store's currency.
- Photos. The first image is the card image; shoot the finished product, not the artwork file.
- Description. Sizes, materials, turnaround — the questions you'd otherwise answer by message.
- Active or not. Only active products appear on the storefront, so you can stage seasonal items.
The part that makes this store different from a generic shop builder: each product page can carry a Customize Your Badge button (toggle it in the website editor's Settings tab). It opens the badge designer right inside your store — the customer uploads a photo, adds text, sees the real print preview, and their finished design attaches to the order as a print-ready file. No emailing artwork back and forth, no fixing files.
Step 3 — Shipping
Shipping is configured in the dashboard (Website Developer → Shipping), and checkout enforces it automatically:
- Courier delivery — with separate in-state and out-of-state rates if you charge differently by distance.
- Local pickup — always free; customers choose it at checkout and skip the delivery charge entirely.
- Free-shipping threshold — orders at or above your figure ship free. This is the single best average-order-value lever a small store has: set it a little above your typical order and watch customers add one more item to reach it.
If you enable only one method, checkout skips the choice step and applies it. One caution: the Shipping info section you can add to your home page is display copy — the number that actually changes checkout totals is the dashboard threshold, so keep the two in agreement.
Step 4 — Payment methods
Checkout offers whatever you have enabled and configured; the customer picks one at the payment step:
- Pay by invoice — the zero-setup option: the order arrives, you invoice the customer however you already bill. On by default.
- Scan to pay — upload your payment QR code (UPI, PayNow, bank app — whatever your customers scan) and it's shown at checkout.
- PayPal — set your PayPal email.
- Card payments via Stripe — connect with your Stripe publishable key.
- Square — connect your Square location.
Start with invoice plus one instant method your local customers actually use. Every method you configure appears automatically; nothing extra to wire into the site.
Step 5 — The website editor
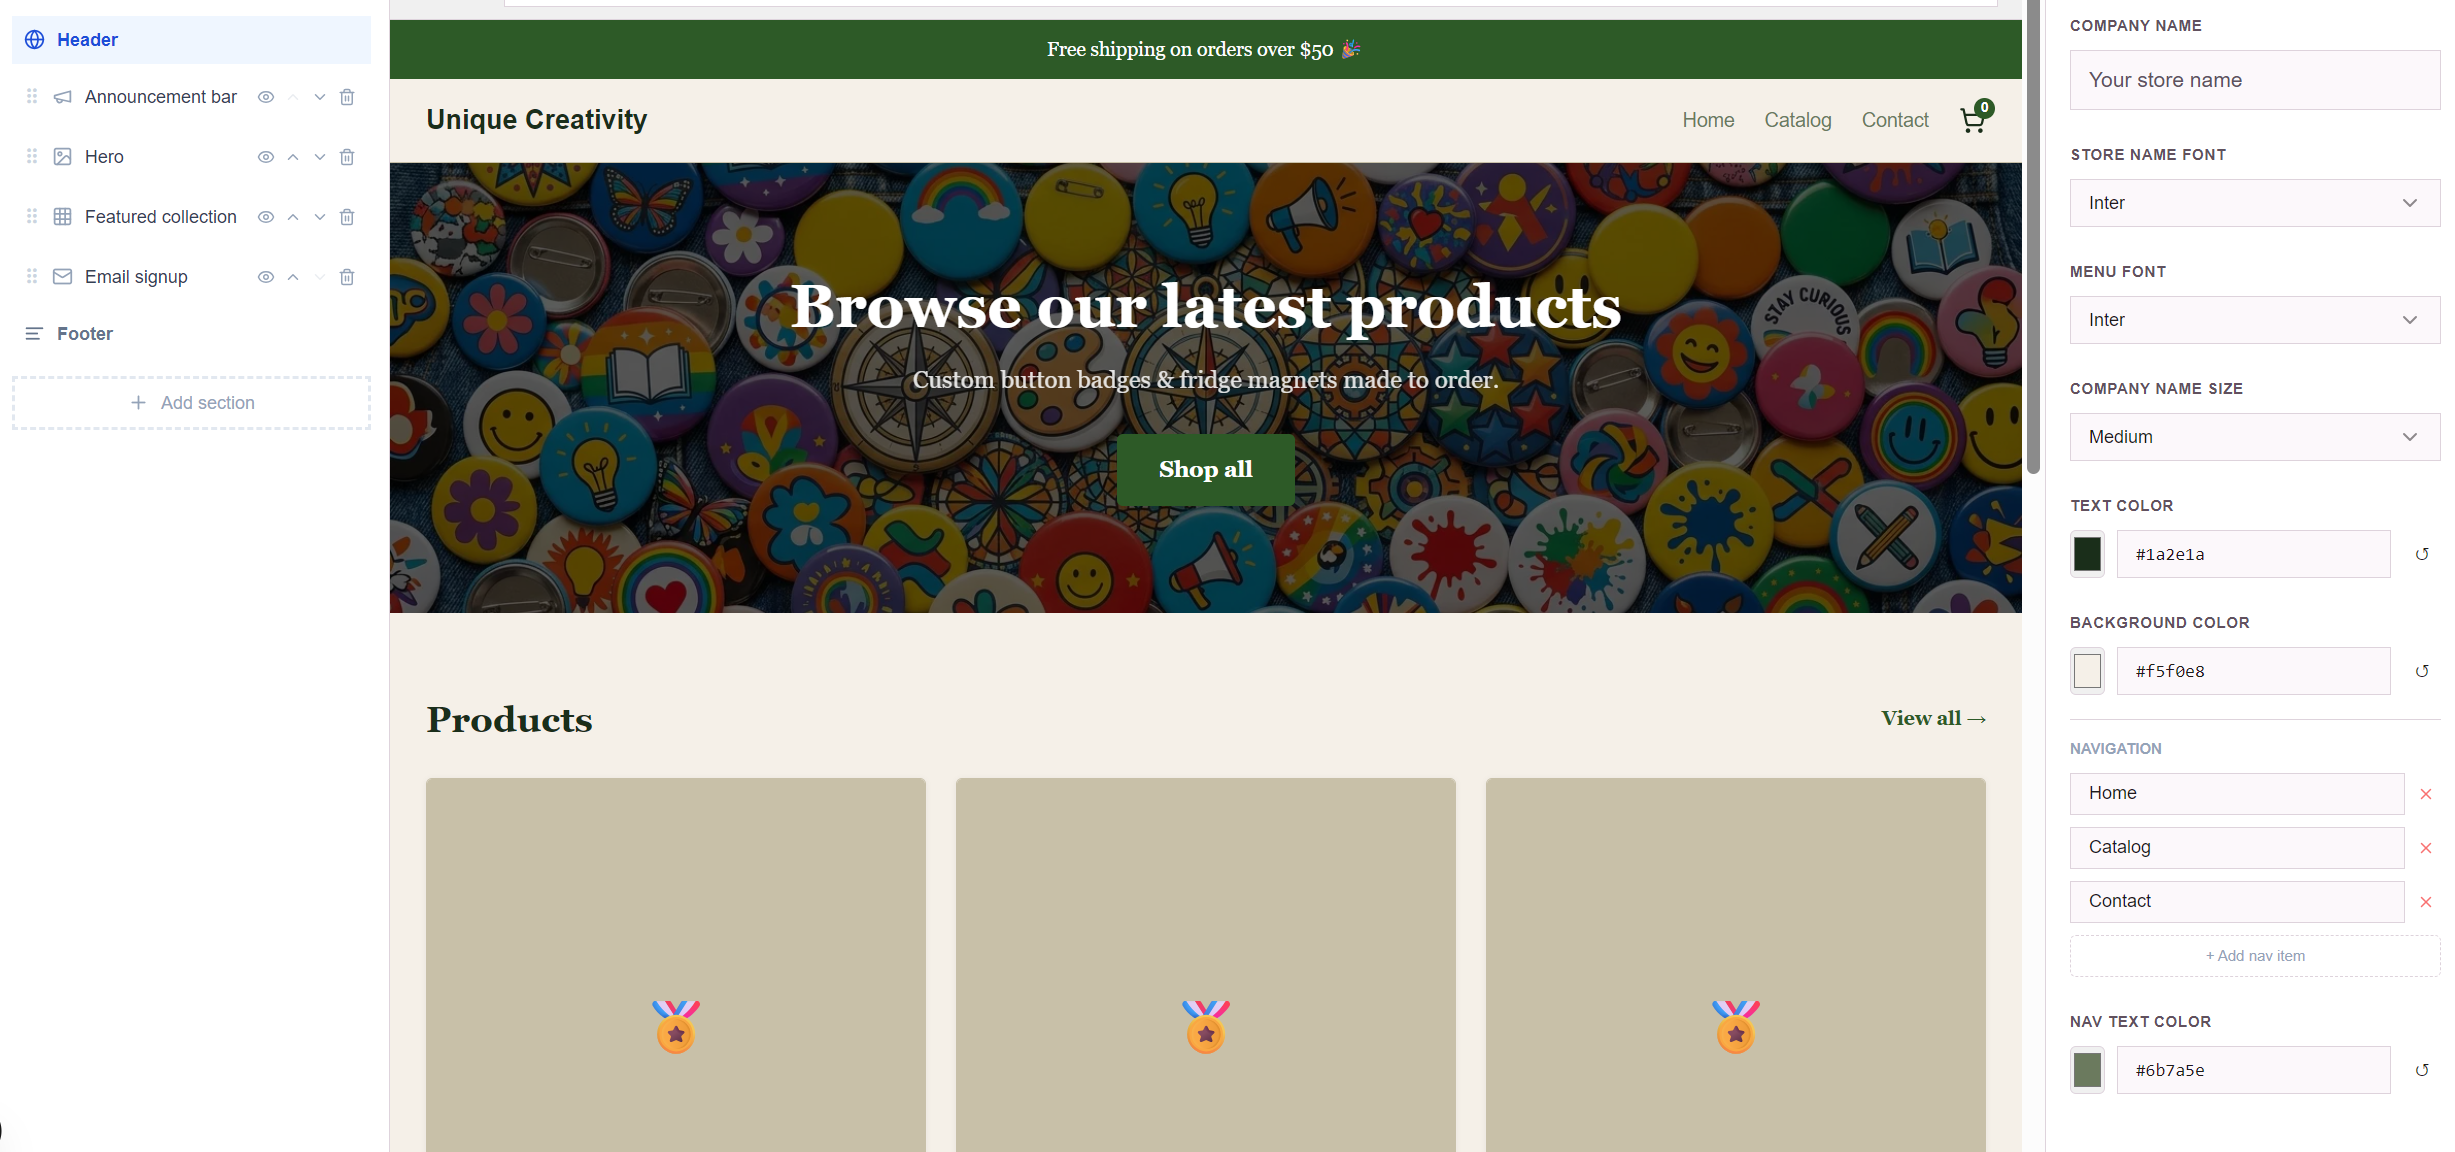
Open Website Developer → Design your website and you're in the visual editor: a live preview of your store in the middle (with desktop, tablet and phone views), and a rail of four workspaces on the left.
Sections — the home page's building blocks
Your home page is a stack of sections. Add, reorder (drag, or the arrow buttons), hide or delete them from the Sections panel; click one to edit it. The library covers a storefront's whole vocabulary: announcement bar, hero, featured collection, text block, image with text, image gallery, video, testimonials, FAQ, email signup, shipping info and contact form.
Selecting a section opens its settings with two tabs:
- Content — what it says: headlines, body text, images, reviews, questions, button text and links.
- Design — how it looks: its layout variant (a hero can be centred, left-aligned, or split beside its image; testimonials can be cards or large quotes), plus per-section colours, fonts, button style and spacing. Everything follows your store design until you change it, and one click returns the section to matching the store.
The Design tab — your store's whole look
The Design workspace styles the entire storefront in three decisions:
- Choose a look — ten designed themes, from classic clean layouts to editorial, bold and boutique styles. Switching looks never touches your text, products or sections.
- Brand colour — curated swatches, or paste your exact brand hex under Custom. Button text automatically stays readable on whatever colour you pick.
- Fonts — a heading font and a text font, from the same 51-font library the badge designer uses.
A collapsed Fine-tune layout group holds the deeper dials — spacing between sections, heading size, page width, button shape, product-card style — for when you want them, out of the way when you don't.
Header, footer and menu
Click the Header row to set your store name, its size, fonts (store name and menu separately, or leave both following the store fonts), colours, and the menu items themselves. The footer gets its own font, colours, copyright line and links, plus an optional "create an account" link for customers.
Pages beyond the home page
The Pages panel manages your Contact page (with a working message form), Terms of Service and Privacy/Shipping/Returns policy pages — sensible defaults included, every word editable, each page toggleable. The Settings tab covers the rest: browser tab title, the description search engines show, the Customize button toggle, and your custom domain.
Step 6 — A home page that sells: a recipe
- Announcement bar — one line, one offer: "Free shipping over $50" or "Order by Thursday for weekend events". It sits above the header on every visit.
- Hero — your best product photo as the background (use the darken slider so the headline stays readable), a headline that says what you make and for whom, and a button. Try the split layout for a boutique feel.
- Featured collection — your products, three per row. Show prices; hide descriptions if your photos speak.
- Image with text — the "why us" block: your press, your turnaround, your story. Give the button a link — your contact page, or a bestseller.
- Testimonials — three short real quotes beat ten long ones. The large-quote layout suits a premium look.
- FAQ — sizes, minimum orders, artwork requirements, delivery times. Every question here is a message you won't answer twice.
- Email signup — collect addresses from visitors who aren't ready to buy today.
Step 7 — Preview, then publish
The Preview button opens your full site in a new tab — every page, exactly as customers will see it, including changes you haven't saved yet (a banner reminds you it's a draft). Save stores your work; Publish puts it live. Once published, the same button becomes Update live site, and you can switch back to the simple store at any time. Connect a custom domain in Settings and the store serves there with SSL.
Step 8 — How an order actually works
Here is the full journey once a customer lands on your store:
- They browse and customise. Product pages show your photos and pricing; with the Customize button on, they design their own badge in the embedded designer and the finished artwork attaches to their cart item.
- Cart and checkout. Checkout walks delivery method (courier or pickup), address, then payment — showing exactly the methods you enabled, with shipping calculated from your dashboard rates and threshold.
- The order is created with a reference number, the items, any custom designs, the address and chosen payment method.
- Two emails go out automatically (see below), and the customer sees a confirmation page.
- You process it. The order appears in your dashboard with everything you need — including print-ready files for customised items. You move its status through new → processing → dispatched → delivered (or cancelled), and the customer sees the current status live on their account page, so "where's my order?" answers itself.
- Finance. The dashboard's finance view totals your store orders alongside your client-portal orders, so revenue reporting is already done.
Customers can create an account on your store (or order as guests where enabled) — signed-in customers get an order history with live statuses, scoped to your store only.
Step 9 — Email automations
Three emails run without you touching anything, all sent from the platform's address with your store's name on them:
- Order confirmation to the customer — reference number, items, totals — the moment checkout completes.
- New-order notification to you — the order summary lands in your inbox, so you hear about orders without watching the dashboard.
- Contact messages to you — the contact form and contact page deliver the message to your dashboard inbox and your email, with the customer's reply address.
Email-signup subscribers are collected under your account for your newsletters. And every address involved is handled server-side — customers can't be spammed through your store, and nobody can send mail "from" it but the platform.
Launch checklist
- URL claimed, products active with real photos and honest prices
- Shipping rates and free-shipping threshold set — and the home-page shipping section quoting the same numbers
- At least two payment methods configured
- Hero headline says what you sell in one line; every button has a destination
- FAQ answers your five most-asked questions
- Contact details filled in on the contact page
- Previewed on phone as well as desktop — most of your customers are on phones
- Tab title and search description written in Settings
- Test order placed by you, end to end, before you share the link
Then publish, put the link in your social bios and on your market-stall signage, and let the store answer questions while you press badges. The full designer-to-doorstep flow — customer designs, you print, they track — is what the website builder was built for.
Frequently Asked Questions
Do I need to know how to code to build the store?
No. The website editor is entirely visual: you click a section, type into its settings, and watch the live preview update. Themes, colours, fonts and layouts are all picked from menus.
Is the store website free?
Designing and previewing the full site is free. Publishing it live to customers is part of the Business Pro plan — so you can build everything and see exactly what customers would see before paying.
Can I use my own domain name?
Yes. Connect your domain in the website editor's Settings tab and your store serves there with SSL, alongside the mybadgestudio.com/store address.
How do customers pay me?
You choose which methods checkout offers: pay by invoice, a scan-to-pay QR code, PayPal, card payments via Stripe, or Square. Any method you configure appears automatically at checkout.
How do I know when I get an order?
An order notification email is sent to you automatically the moment checkout completes, and the order appears in your seller dashboard with the items, address, payment method and any customer-designed print files.
Does the customer get an order confirmation?
Yes — an automatic confirmation email with their reference number, items and totals, sent when the order is placed. Signed-in customers can also track their order's status live on your store's account page.
Can customers design their own badges on my website?
Yes — that is the point. With the Customize button enabled, product pages open the badge designer inside your store; the customer's finished design attaches to the order as a print-ready file.
How is shipping calculated at checkout?
From your dashboard settings: courier rates (with separate in-state and out-of-state charges if you use them), free local pickup, and an optional free-shipping threshold that zeroes the charge above your figure.