How to Make Print-and-Cut Stickers to Sell on Etsy
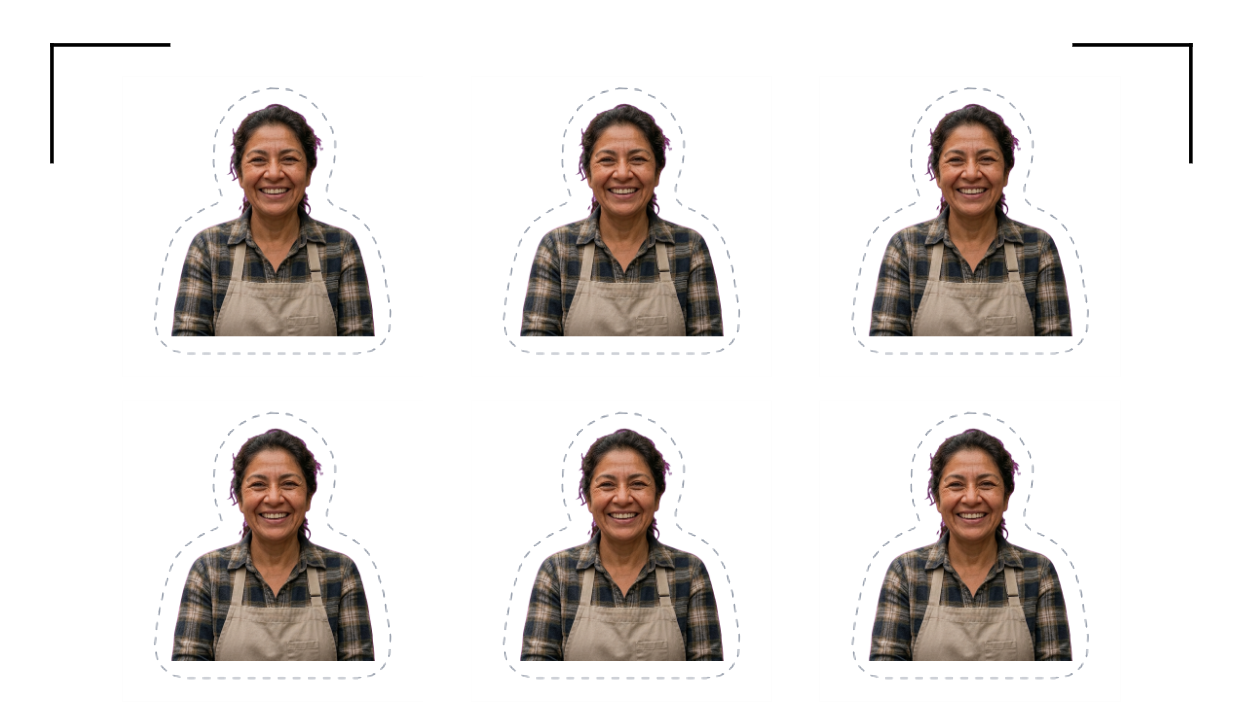
Sticker sheets are one of the best-selling handmade products on Etsy — and the part that trips up new sellers isn't the art, it's the technical bit: laying designs out on a sheet with clean die-cut lines and the registration marks a cutting machine needs. Here is how to make print-and-cut stickers to sell, start to finish, with a free browser tool.
What you need
- An inkjet printer — almost any home inkjet prints stickers well. (Laser works too, but inkjet is the norm for sticker paper.)
- Printable sticker paper or vinyl — matte, glossy or clear, in A4 or US Letter. Vinyl is more durable and water-resistant; paper is cheaper for indoor stickers. A laminate sheet on top adds scratch and water resistance.
- A cutting machine or a steady hand — a Cricut, Silhouette or Brother machine cuts each sticker for you with Print Then Cut; scissors or a craft knife work for simple shapes.
The layout is the hard part — so don't do it by hand
Arranging a dozen stickers on a sheet, adding an even die-cut outline around each, and placing registration marks so a machine can find the artwork is an afternoon of fiddling in most design apps. The free sticker template does it automatically: upload your designs and each one gets a die-cut outline; the sheet arrives with registration marks and cut lines already in place.
Step by step
- Open the sticker template. Choose a sticker size and your paper format — the sheet layout, die-cut outlines and registration marks appear automatically.
- Upload your artwork. Drop in your designs; each lands in its own die-cut shape. Transparent PNGs work best so the cut follows the artwork's edge.
- Arrange the sheet. Fill the page — repeat one design or mix several. On a paid plan you can pack different sizes onto one sheet to waste less paper and vinyl.
- Download your files. Export a print-ready PDF for Print Then Cut, and — if a machine is cutting — a transparent PNG and SVG/DXF cut files. Everything is 300 DPI with bleed handled.
- Print, then cut. Print at 100% scale on your sticker paper, and cut on your machine (or along the printed lines by hand).
Cutting with a Cricut (Print Then Cut)
For a Cricut, the reliable route is Print Then Cut: print your sheet on your own printer, then let the Cricut read its registration marks and cut each sticker to its edge. Upload the transparent-background PNG for this — Cricut treats an uploaded SVG's images as solid black, so a full-colour SVG won't print, but a transparent PNG prints in full colour and cuts cleanly. Prefer to cut a pre-printed sheet or blanks? Use the Cut Lines Only (SVG) export instead. The full walkthrough is in our Cricut cutting guide.
Selling them on Etsy
- Sell sets and bundles. A sheet of matching designs, or "collect them all" packs, lifts your average order value more than single stickers.
- Show the finished sheet. Etsy buyers scan photos fast — a clean shot of the whole sheet sells the value at a glance.
- Price for your time. Materials for a sheet are pennies; price for design, printing, cutting and packing, not just paper.
- Personalised orders? Etsy doesn't allow a designer embedded in a listing (that's a Shopify/WordPress feature). Instead, share your Event/Client portal link or QR in the listing or your thank-you message — buyers upload their photo or design, and it lands in your inbox print-ready, with no back-and-forth in Etsy chat.
Print & finishing tips
- Always print at 100% / "actual size" — "fit to page" shifts the artwork off the cut lines.
- Let ink dry a minute before laminating or cutting; sticker paper absorbs ink more slowly than plain paper.
- Matte is forgiving and takes a laminate beautifully; gloss makes colours pop but shows fingerprints. Clear vinyl suits "no cut border" looks.
- Do a test cut on a corner first, and calibrate Print Then Cut once for your printer — it pays off on every sheet after.
Frequently Asked Questions
How do I make stickers to sell on Etsy?
Design a sticker sheet in a free online template that adds die-cut outlines and registration marks, print it on inkjet sticker paper at 100% scale, then cut each sticker with a Cricut/Silhouette (Print Then Cut) or by hand. List them as sheets or bundles on Etsy.
Can I add a sticker designer to my Etsy listing?
No — Etsy doesn't allow embedded tools or custom code in listings (that's a Shopify/WordPress feature). For personalised orders, share your Event/Client portal link or QR code so buyers upload their design and it arrives in your inbox print-ready.
What do I need to print and cut stickers at home?
An inkjet printer, printable sticker paper or vinyl, and a cutting machine (Cricut, Silhouette or Brother) for die-cut sticker sheets — or scissors for simple shapes. A laminate sheet adds water and scratch resistance.
Do you export SVG cut files for a cutting machine?
Yes. Alongside the print-ready PDF you can download SVG/DXF cut files, or a transparent PNG for Cricut's Print Then Cut, so any print-and-cut machine can follow your outlines exactly.
Is it really free to design sticker sheets?
Yes — laying out sheets, adding die-cut outlines and exporting cut files all work free in the browser. Paid plans remove the small rim label and add higher volume for people selling at scale.